How to replace the seals in a 240v Macerator Pump?
Leave a message
Hey there! I'm a supplier of 240v Macerator Pumps, and today I'm gonna walk you through the process of replacing the seals in a 240v Macerator Pump. It might seem a bit daunting at first, but with the right steps and a bit of patience, you can get it done.
Why Replace the Seals?
Before we jump into the replacement process, let's talk about why you might need to replace the seals in your 240v Macerator Pump. Over time, the seals can wear out due to constant exposure to water, chemicals, and mechanical stress. When the seals start to fail, you might notice leaks around the pump, which can lead to water damage and reduced pump efficiency. So, replacing the seals is crucial to keep your pump running smoothly and prevent any potential issues.
Tools and Materials You'll Need
To replace the seals in your 240v Macerator Pump, you'll need the following tools and materials:
- A set of screwdrivers (both flathead and Phillips)
- A pair of pliers
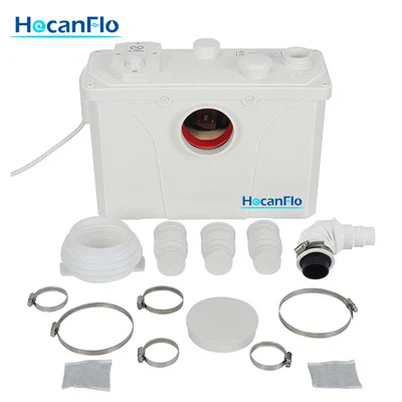
- A seal kit specifically designed for your 240v Macerator Pump
- A clean cloth or rag
- A container to catch any water that might drain out of the pump
Step-by-Step Guide to Replacing the Seals
Now that you have all the necessary tools and materials, let's get started with the replacement process.
Step 1: Turn Off the Power
Before you start working on the pump, make sure to turn off the power supply to avoid any electrical hazards. Locate the circuit breaker or switch that controls the pump and switch it off.
Step 2: Drain the Pump
Next, you'll need to drain any water that might be in the pump. Place the container under the pump to catch the water. Open the drain valve or remove the drain plug (if your pump has one) to let the water drain out. Make sure to drain the water completely before proceeding to the next step.
Step 3: Remove the Pump Cover
Using the screwdriver, remove the screws that hold the pump cover in place. Carefully lift the cover off the pump and set it aside. Be careful not to damage the cover or any of the components inside the pump.
Step 4: Locate the Seals
Once you have removed the pump cover, you'll be able to see the seals. The seals are usually located around the shaft of the pump and at the connections between the pump housing and the motor. Take a close look at the seals to identify any signs of damage or wear.
Step 5: Remove the Old Seals
Using the pliers, carefully remove the old seals from the pump. Be gentle to avoid damaging the pump housing or the shaft. If the seals are stuck, you can use a small amount of lubricant to help loosen them.
Step 6: Clean the Seal Surfaces
After removing the old seals, use the clean cloth or rag to clean the seal surfaces. Make sure to remove any dirt, debris, or old sealant from the surfaces. This will ensure a proper seal when you install the new seals.


Step 7: Install the New Seals
Take the new seals from the seal kit and apply a small amount of lubricant to the seals. This will make it easier to install the seals and prevent them from getting damaged. Carefully place the new seals in the same position as the old seals. Make sure the seals are properly seated and aligned.
Step 8: Reassemble the Pump
Once you have installed the new seals, carefully reassemble the pump. Place the pump cover back on the pump and secure it with the screws. Make sure the cover is properly aligned and tightened.
Step 9: Refill the Pump
After reassembling the pump, refill it with water. Close the drain valve or replace the drain plug. Make sure the water level is at the appropriate level as specified in the pump's manual.
Step 10: Turn On the Power
Finally, turn on the power supply to the pump. Check for any leaks around the pump and make sure the pump is running smoothly. If you notice any leaks or issues, turn off the power immediately and check the seals again.
Tips and Tricks
- Make sure to follow the manufacturer's instructions when replacing the seals. Different pumps may have different seal replacement procedures, so it's important to read the manual carefully.
- Use high-quality seal kits to ensure a proper seal and long-lasting performance. You can find seal kits specifically designed for your 240v Macerator Pump at most hardware stores or online.
- If you're not comfortable replacing the seals yourself, you can always hire a professional plumber or technician to do the job for you. They have the experience and expertise to replace the seals safely and efficiently.
Conclusion
Replacing the seals in a 240v Macerator Pump is a relatively simple process that can be done with the right tools and materials. By following the steps outlined in this guide, you can keep your pump running smoothly and prevent any potential issues. If you have any questions or need further assistance, feel free to contact us. We're a supplier of 240v Macerator Pumps, and we're here to help you with all your pump needs.
If you're in the market for a new Macerator Pump, check out our Macerator Disposal Pump, Basement Waste Water Macerator Pump, or New Macerating Pump. We offer high-quality pumps at competitive prices. If you're interested in purchasing any of our products or have any questions about our pumps, don't hesitate to reach out for a purchase negotiation.
References
- Manufacturer's manual for your 240v Macerator Pump
- Online resources and tutorials on pump maintenance and repair